




UNDER ATTACK?
WE'RE ON IT.
Routes you straight to the team. Every packet bound for your service passes through our multi-layered, in-house mitigation pipeline. Malicious traffic is dropped at each stage, so only clean traffic ever reaches your servers.
Already a 1of1 Servers customer? This DDoS protection is already included with your services, so there's no need to purchase it.

1of1 Servers RemoteShield
Lightweight client that tunnels your traffic through our scrubbing network. Install, connect, and you're protected in seconds.

7-Day Money-Back Guarantee
Not happy in the first week? Full refund, no questions asked.
> Custom DDoS Protection
Filtering on our own network. We can patch any attack.
> Unlimited Attack Traffic
No overage bills, no matter how big the attack.
> Built for Game Servers
Layer 4 and Layer 7 protection, tuned for game traffic.
> Any Host, Any Provider
Setup takes minutes. Keep the server you already have.
> Always-On Protection
Mitigation runs 24/7, so you're covered from the very first packet.
> Zero Added Latency
Filtering happens on the path your traffic already takes, with no slowdown for players.
WHAT EACH PLAN INCLUDES
Every tier runs the same in-house mitigation pipeline.
32 Players
$39.99/mo- 32 protected players
- Unlimited attack traffic
- Layer 4 & 7 protection
- Any host, any provider
- Always-on protection
- 7-day money-back guarantee
64 Players
$79.99/mo- 64 protected players
- Unlimited attack traffic
- Layer 4 & 7 protection
- Any host, any provider
- Always-on protection
- 7-day money-back guarantee
150 Players
$129.99/mo- 150 protected players
- Unlimited attack traffic
- Layer 4 & 7 protection
- Any host, any provider
- Always-on protection
- 7-day money-back guarantee
Unlimited Players
$249.99/mo- Unlimited protected players
- Unlimited attack traffic
- Layer 4 & 7 protection
- Any host, any provider
- Always-on protection
- 7-day money-back guarantee
Gaming Profiles
- FiveM
- RedM
- Minecraft
- Rust
- DayZ
- Other games - contact us for custom protection
FULL SETUP GUIDE
Everything you need to get RemoteShield running on your server.
- 1
Allowlist your antivirus
1of1RemoteShield bundles a WireGuard tunnel driver, which antivirus software (including Windows Defender) can wrongly flag and quarantine. Add these exclusions before you install.
Fastest fix: open PowerShell as Administrator (Start Menu → type "PowerShell" → right-click → Run as Administrator), paste this, then download and run the app.
powershell (admin)Add-MpPreference -ExclusionPath "C:\Program Files\1of1RemoteShield" Add-MpPreference -ExclusionPath "C:\ProgramData\1of1Shield" Add-MpPreference -ExclusionPath "$env:USERPROFILE\Downloads" Add-MpPreference -ExclusionProcess "1of1RemoteShield.exe"Prefer to click? Windows Security → Virus & threat protection → Manage settings → Exclusions → Add an exclusion → Folder, then add C:\Program Files\1of1RemoteShield. If it is still removed, temporarily turn off real-time protection while you install.
- 2
Grab your tunnel config
Your unique tunnel token is generated in your 1of1 Servers dashboard once your plan is active. Open your panel, copy the configuration string, and keep it handy for step 4.
Tokens expire shortly after issue. Regenerate from your panel if yours has aged out.
- 3
Download & run RemoteShield
Grab the Windows client and run it on your game server, then click Yes at the administrator prompt (it manages the tunnel service for you).
- 4
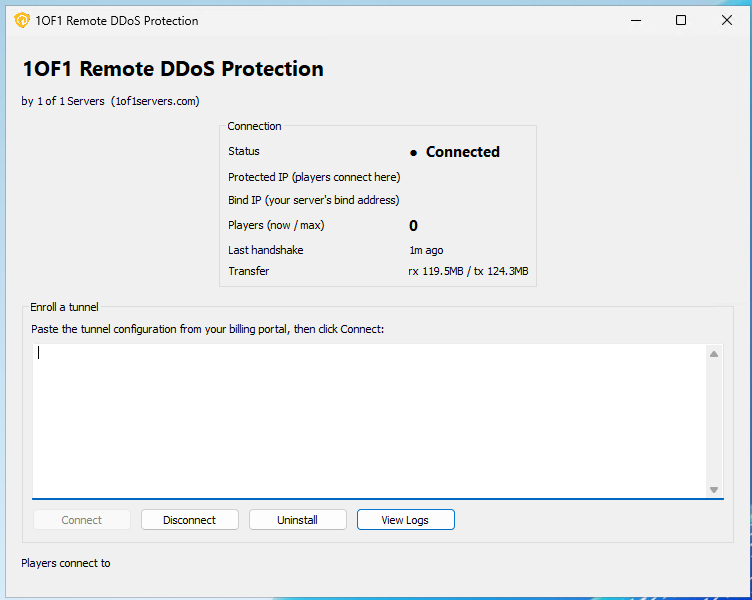
Paste your config & connect
Paste the tunnel configuration from step 2 into the app and click Connect. The app enrolls, installs the background service, and brings the tunnel up, with no commands needed.
- 5
Wait for "Connected"
Give it a moment until the app shows Connected along with your Protected IP. That is the address you will advertise next.
- 6
Update your server.cfg
In your server.cfg, bind to your Bind IP and advertise your Protected IP:
server.cfgset sv_forceIndirectListing true set sv_listingIpOverride "Protected IP" set sv_endpoints "Protected IP:30120"
Need to start over? If you have a new server, a stale config, or a stuck tunnel, click Uninstall in the app to remove the service and all local data, then paste a fresh configuration and click Connect again.

Protect your server before the next attack
